Monday, 27 October 2014

Do free calls for 120 minutes..!!!

Free Calling upto 2 hours ( 120 mins ) to any number

1) Download this app Flipcall and sign up ->https://play.google.com/store/apps/details?id=com.flipcall (7mb )2) Enter friend mobile number in app and call3) Now you will receive a call , Pick that call and your call will be connected to your friend.
( Your friend receive a call from your Number )

Flipcall is giving Rs 61.89 Free credits for new user and Rs 0.53 will be deduct from Flipcall credit for 1 min calling so with these free Flipcall Credits you can call upto 120 mins.
( Your friend receive a call from your Number )
Flipcall is giving Rs 61.89 Free credits for new user and Rs 0.53 will be deduct from Flipcall credit for 1 min calling so with these free Flipcall Credits you can call upto 120 mins.


DO SHARE THIS PAGE FOR MORE UPDATES..!!1

Wednesday, 1 October 2014

DOUBLE YOUR RECHARGE...!!!


1) FreeCharge - Rs.20 Cashback on Rs.10 or more for doing payment using credit/debit card 
Do recharge using Freecharge App .No coupon require.
( Not working on Free-Charge Credits )

2) Paytm - Rs.10 cashback on Rs.30 or more
Promocode "A100" ( A100 working on app only )
Promocode "CB100" ( working on website and app both )
A100 and CB100 both can be used maximum10 times and valid till 3rd October for old user also.
By using both code you will get 20 times Rs.10 cashback 

3) Paytm Rs.100 cashback on Rs.400 DTH Recharge
Promocode "DTH100" ( valid till 3rd October )

3) Mobikwik New User Offer - Add Rs.100 and get Cashback of Rs.100 on android app only
Add 100 Rs to your wallet,
Goto my account and redeem Promocode "100PE100"
( Valid on android app till 10 oct )

4) Mobikwik New User Offer - Add Rs.50 and get Cashback of Rs.50
Promocode "ENTERMOBI"

Monday, 29 September 2014

NEED 50 RS FREE RECHARGE..!!DOWNLOAD GANNA..!!


Displaying

Free Recharge of Rs.50 For installing "Ganna" App and login with Facebook
[For Android & IOS ]
Read Full post before step 2
1) Download Ganna app -> https://play.google.com/store/apps/details?id=com.gaana&hl=en
2) Login with facebook while it show Rs.50 Free Recharge.Not login while showing 50 points
[ Login with facebook may take 2-3 min ]
After successful login.You will see a pop up like below 2nd photo and click on "send code"
Paytm coupon of Rs.50 will be send to your email.Do recharge with Rs.50 from paytm.com using coupon

 
 Big Warnings:
**Before login Check have you set your Email-id as primary Email on facebook .Many times mobile number is set as a primary Email.
To check goto setting -> general
**Facebook Account must be atleast 90 days old & must have atleast 10 Friends.

Any problem/queries comment on this post or message us 

Saturday, 20 September 2014

RECHARGE WARM UPS..!!


Get Rs.20 Recharge for downloading History TV18 App
1) Open this link and download app -> goo.gl/0aaIpI
2) Open app and open menu From your left hand side corner and click on user setting and Enter Mobile number and Then email id
3) You will get a email on email id that have Rs.20 coupon of FreeCharge.Now do recharge with Rs.20 from FreeCharge by using that coupon

UNDERSTANDING ARDUINO AND PROGRAM CONNECTIONS


I am gonna explain how the connections are going to be made in an arduino based on your program.
SINCE i have already posted a one sensor program i would like to explain the connections based on that code.


ONE SENSOR CODE
void setup()
{
pinMode(4,OUTPUT); //enable a
pinMode(8,OUTPUT); //enable b
pinMode(2,OUTPUT); //motor A
pinMode(3,OUTPUT);//motor A
pinMode(10,OUTPUT);//motor b
pinMode(9,OUTPUT);//MOTOR B
pinMode(5,INPUT);
pinMode(6,INPUT);
Serial.begin(9600);
}
void loop()
{
  digitalWrite(4,HIGH);
  digitalWrite(8,HIGH);
  int lsen,rsen;
  lsen=digitalRead(5);
  rsen=digitalRead(6);
  Serial.println(lsen);
  if((lsen==HIGH)&&(rsen==LOW))
  {
    right();
  }
  else if((rsen==HIGH)&&(lsen==LOW))
  {
    left();
  }
  else if((rsen==HIGH)&&(lsen==HIGH))
  {
    Stop();
  }
}
  
  void right()
  {
  digitalWrite(2,HIGH);
  digitalWrite(3,LOW);
  }
  void left()
  {
    digitalWrite(10,HIGH);
    digitalWrite(9,LOW);
  }
  void Stop()
  {
    digitalWrite(2,LOW);
    digitalWrite(3,LOW);
    digitalWrite(10,LOW);
    digitalWrite(9,LOW);
  }


REFER PREVIOUS POST TO DOWNLOAD THE CODE...!!!

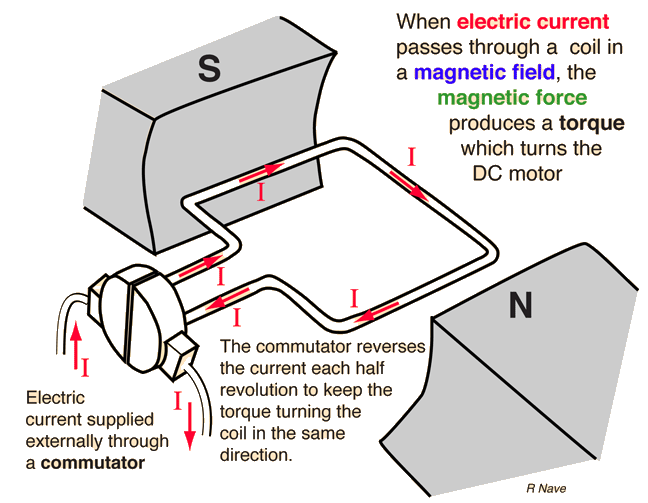
before getting into the connections you must know how a DC motor works .

For a DC motor as the above diagram depicts when you supply a potential difference on the coil of the motor it generates a torque in either clock-Wise or anti clock wise direction.For example consider it has a torque in clock-wise direction and if you wish to have a anti-torque then it would be better to change the direction of the flow of current.
So in order for the ROBOT to move forward or backward both the wheels has to rotate in the same direction.If the ROBOT has to take a left or right turn then two turns are possible

TYPES OF TURNS A WHEELED ROBOT CAN MAKE

1)90 degree turn
2)Fast angled turn

1) If you need your ROBOT to get a 90 degree turn then you must rotate one wheel in clockwise and another wheel in anti-clockwise direction. 

2)if you need a fast angled turn then it is desired to stop either wheel and run the next wheel.

HOW TO TAKE A LEFT TURN or RIGHT TURN


If you wish your robot to take a left turn with 90 degree turn then it is desired to have a anti-clock torque with the left wheel and clockwise torque with the right wheel.
similarly if your robot wants to take a fight 90 degree turn then it must be vise-verse.

if you wish your robot to make a fast angled left turn then it is desired to stop the left motor and run the right motor and if you wish your robot to take a right turn then it must have a reflecting effect.


BASIC UNDERSTANDING

so from the above topics you must know that you need to control the polarities of the motor using the arduino.So when you need your robot to take a left turn you must give the possible potential difference to the motor and achieve the task.


Tuesday, 16 September 2014


Assembling of Line Follower

STEP 1:Place the motors on ur chassis and check the height of the BOT by fixing the wheels.
 
STEP 2: Place your arduino and H-BRIDGE on appropriate position for your connections
  
STEP 3: Place your sensors according to the problem statement

 STEP 4:your final bot . i will explain you the connections and the detailed configuration of the H-Bridge or Motor Driver IC (L293D)

Monday, 15 September 2014

One Sensor Line follower Arduino code
void setup()
{
pinMode(4,OUTPUT); //enable a
pinMode(8,OUTPUT); //enable b
pinMode(2,OUTPUT); //motor A
pinMode(3,OUTPUT);//motor A
pinMode(10,OUTPUT);//motor b
pinMode(9,OUTPUT);//MOTOR B
pinMode(5,INPUT);
pinMode(6,INPUT);
Serial.begin(9600);
}
void loop()
{
  digitalWrite(4,HIGH);
  digitalWrite(8,HIGH);
  int lsen,rsen;
  lsen=digitalRead(5);
  rsen=digitalRead(6);
  Serial.println(lsen);
  if((lsen==HIGH)&&(rsen==LOW))
  {
    right();
  }
  else if((rsen==HIGH)&&(lsen==LOW))
  {
    left();
  }
  else if((rsen==HIGH)&&(lsen==HIGH))
  {
    Stop();
  }
}
 
  void right()
  {
  digitalWrite(2,HIGH);
  digitalWrite(3,LOW);
  }
  void left()
  {
    digitalWrite(10,HIGH);
    digitalWrite(9,LOW);
  }
  void Stop()
  {
    digitalWrite(2,LOW);
    digitalWrite(3,LOW);
    digitalWrite(10,LOW);
    digitalWrite(9,LOW);
  }
DOWNLOAD THE ARDUINO CODE
https://docs.google.com/uc?export=download&id=0ByPWe4jRT6yGZEhGUDE0RFVtVFE